كيف تُنشئ تقويمًا شهريًّا أو سنويًّا في Excel؟
هل تحتاج أحيانًا إلى إنشاء تقويم لشهر أو سنة محددة في Excel؟ يقدّم لك هذا البرنامج التعليمي الحيل الذكية لإنشاء تقويم شهري أو سنوي في Excel بسرعة!
إنشاء تقويم شهري أو سنوي باستخدام قالب Excel
إنشاء تقويم شهري أو سنوي بسهولة باستخدام تقويم دائم
إنشاء تقويم شهري أو سنوي باستخدام قالب Excel
في Excel، يمكنك استخدام قالب تقويم لإنشاء تقويم شهري أو سنوي بسهولة واحترافية.
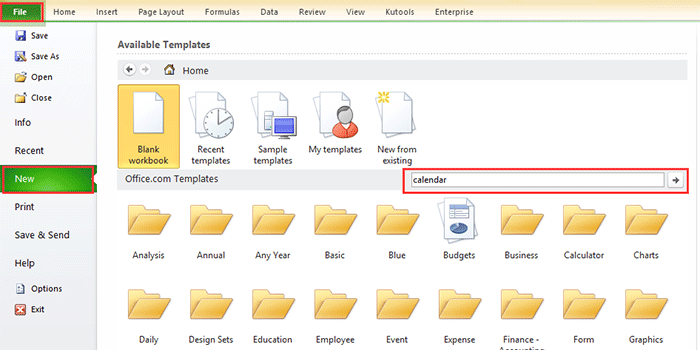
1. في Excel 2010/2013، انقر فوقFile > New، وفي Excel 2007، انقر فوقOffice Button > New، ثم في القسم الأيمن من النافذة المنبثقة، اكتبcalendar في مربع البحث. انظر لقطة الشاشة:
في Excel 2010/2013
في Excel 2007

2. اضغط علىEnter، ثم ستظهر عدة أنواع من التقاويم في النافذة. اختر نوع التقويم الذي تحتاجه، وانقر فوقDownload (or Create) في الجزء الأيمن. انظر لقطة الشاشة:

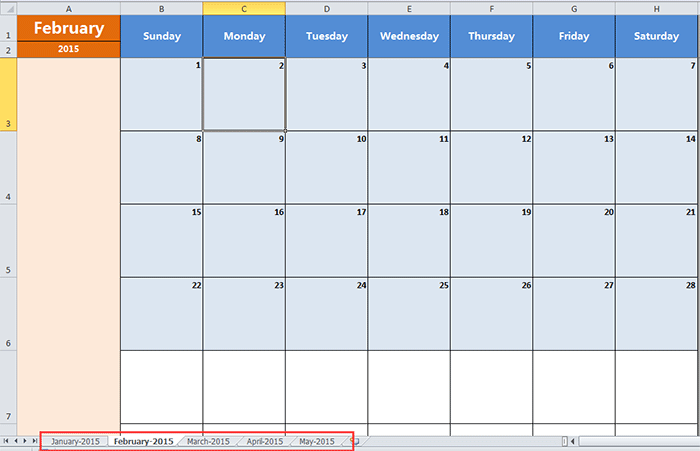
لقد تم الآن إنشاء تقويم في ورقة عمل جديدة. راجع لقطة الشاشة:

إنشاء تقويم شهري باستخدام VBA
أحيانًا، قد تحتاج إلى إنشاء تقويم لشهر واحد محدد، كيناير 2015 مثلاً. وقد يصعُب عليك قليلًا العثور على قالب تقويم مناسب باستخدام الطريقة المذكورة أعلاه. ولذلك، أقدّم لك كود VBA الذي سيساعدك في إنشاء تقويم شهري دقيق بكل سهولة.
1. اضغط علىAlt + F11 لفتح نافذةMicrosoft Visual Basic for Applications، ثم انقر فوقInsert > Module، والصق كود VBA أدناه في النافذة.
VBA: إنشاء تقويم شهري.
Sub CalendarMaker()
       ' Unprotect sheet if had previous calendar to prevent error.
       ActiveSheet.Protect DrawingObjects:=False, Contents:=False, _
          Scenarios:=False
       ' Prevent screen flashing while drawing calendar.
       Application.ScreenUpdating = False
       ' Set up error trapping.
       On Error GoTo MyErrorTrap
       ' Clear area a1:g14 including any previous calendar.
       Range("a1:g14").Clear
       ' Use InputBox to get desired month and year and set variable
       ' MyInput.
       MyInput = InputBox("Type in Month and year for Calendar ")
       ' Allow user to end macro with Cancel in InputBox.
       If MyInput = "" Then Exit Sub
       ' Get the date value of the beginning of inputted month.
       StartDay = DateValue(MyInput)
       ' Check if valid date but not the first of the month
       ' -- if so, reset StartDay to first day of month.
       If Day(StartDay) <> 1 Then
           StartDay = DateValue(Month(StartDay) & "/1/" & _
               Year(StartDay))
       End If
       ' Prepare cell for Month and Year as fully spelled out.
       Range("a1").NumberFormat = "mmmm yyyy"
       ' Center the Month and Year label across a1:g1 with appropriate
       ' size, height and bolding.
       With Range("a1:g1")
           .HorizontalAlignment = xlCenterAcrossSelection
           .VerticalAlignment = xlCenter
           .Font.Size = 18
           .Font.Bold = True
           .RowHeight = 35
       End With
       ' Prepare a2:g2 for day of week labels with centering, size,
       ' height and bolding.
       With Range("a2:g2")
           .ColumnWidth = 11
           .VerticalAlignment = xlCenter
           .HorizontalAlignment = xlCenter
           .VerticalAlignment = xlCenter
           .Orientation = xlHorizontal
           .Font.Size = 12
           .Font.Bold = True
           .RowHeight = 20
       End With
       ' Put days of week in a2:g2.
       Range("a2") = "Sunday"
       Range("b2") = "Monday"
       Range("c2") = "Tuesday"
       Range("d2") = "Wednesday"
       Range("e2") = "Thursday"
       Range("f2") = "Friday"
       Range("g2") = "Saturday"
       ' Prepare a3:g7 for dates with left/top alignment, size, height
       ' and bolding.
       With Range("a3:g8")
           .HorizontalAlignment = xlRight
           .VerticalAlignment = xlTop
           .Font.Size = 18
           .Font.Bold = True
           .RowHeight = 21
       End With
       ' Put inputted month and year fully spelling out into "a1".
       Range("a1").Value = Application.Text(MyInput, "mmmm yyyy")
       ' Set variable and get which day of the week the month starts.
       DayofWeek = WeekDay(StartDay)
       ' Set variables to identify the year and month as separate
       ' variables.
       CurYear = Year(StartDay)
       CurMonth = Month(StartDay)
       ' Set variable and calculate the first day of the next month.
       FinalDay = DateSerial(CurYear, CurMonth + 1, 1)
       ' Place a "1" in cell position of the first day of the chosen
       ' month based on DayofWeek.
       Select Case DayofWeek
           Case 1
               Range("a3").Value = 1
           Case 2
               Range("b3").Value = 1
           Case 3
               Range("c3").Value = 1
           Case 4
               Range("d3").Value = 1
           Case 5
               Range("e3").Value = 1
           Case 6
               Range("f3").Value = 1
           Case 7
               Range("g3").Value = 1
       End Select
       ' Loop through range a3:g8 incrementing each cell after the "1"
       ' cell.
       For Each cell In Range("a3:g8")
           RowCell = cell.Row
           ColCell = cell.Column
           ' Do if "1" is in first column.
           If cell.Column = 1 And cell.Row = 3 Then
           ' Do if current cell is not in 1st column.
           ElseIf cell.Column <> 1 Then
               If cell.Offset(0, -1).Value >= 1 Then
                   cell.Value = cell.Offset(0, -1).Value + 1
                   ' Stop when the last day of the month has been
                   ' entered.
                   If cell.Value > (FinalDay - StartDay) Then
                       cell.Value = ""
                       ' Exit loop when calendar has correct number of
                       ' days shown.
                       Exit For
                   End If
               End If
           ' Do only if current cell is not in Row 3 and is in Column 1.
           ElseIf cell.Row > 3 And cell.Column = 1 Then
               cell.Value = cell.Offset(-1, 6).Value + 1
               ' Stop when the last day of the month has been entered.
               If cell.Value > (FinalDay - StartDay) Then
                   cell.Value = ""
                   ' Exit loop when calendar has correct number of days
                   ' shown.
                   Exit For
               End If
           End If
       Next

       ' Create Entry cells, format them centered, wrap text, and border
       ' around days.
       For x = 0 To 5
           Range("A4").Offset(x * 2, 0).EntireRow.Insert
           With Range("A4:G4").Offset(x * 2, 0)
               .RowHeight = 65
               .HorizontalAlignment = xlCenter
               .VerticalAlignment = xlTop
               .WrapText = True
               .Font.Size = 10
               .Font.Bold = False
               ' Unlock these cells to be able to enter text later after
               ' sheet is protected.
               .Locked = False
           End With
           ' Put border around the block of dates.
           With Range("A3").Offset(x * 2, 0).Resize(2, _
           7).Borders(xlLeft)
               .Weight = xlThick
               .ColorIndex = xlAutomatic
           End With

           With Range("A3").Offset(x * 2, 0).Resize(2, _
           7).Borders(xlRight)
               .Weight = xlThick
               .ColorIndex = xlAutomatic
           End With
           Range("A3").Offset(x * 2, 0).Resize(2, 7).BorderAround _
              Weight:=xlThick, ColorIndex:=xlAutomatic
       Next
       If Range("A13").Value = "" Then Range("A13").Offset(0, 0) _
          .Resize(2, 8).EntireRow.Delete
       ' Turn off gridlines.
       ActiveWindow.DisplayGridlines = False
       ' Protect sheet to prevent overwriting the dates.
       ActiveSheet.Protect DrawingObjects:=True, Contents:=True, _
          Scenarios:=True

       ' Resize window to show all of calendar (may have to be adjusted
       ' for video configuration).
       ActiveWindow.WindowState = xlMaximized
       ActiveWindow.ScrollRow = 1

       ' Allow screen to redraw with calendar showing.
       Application.ScreenUpdating = True
       ' Prevent going to error trap unless error found by exiting Sub
       ' here.
       Exit Sub
   ' Error causes msgbox to indicate the problem, provides new input box,
   ' and resumes at the line that caused the error.
   MyErrorTrap:
       MsgBox "You may not have entered your Month and Year correctly." _
           & Chr(13) & "Spell the Month correctly" _
           & " (or use 3 letter abbreviation)" _
           & Chr(13) & "and 4 digits for the Year"
       MyInput = InputBox("Type in Month and year for Calendar")
       If MyInput = "" Then Exit Sub
       Resume
   End Sub
تم الحصول على كود VBA من هذا الموقعhttps://support.microsoft.com/en-us/kb/150774
2. اضغط علىF5 أو زرRun، وستظهر نافذة منبثقة لتذكيرك بإدخال الشهر المطلوب لإنشاء التقويم الخاص به. انظر لقطة الشاشة:

3. انقر فوقOK. الآن تم إنشاء تقويم يناير 2015 في ورقة العمل الحالية.

لكن في الطرق المذكورة أعلاه، هناك بعض القيود؛ فعلى سبيل المثال، إذا كنت تريد إنشاء تقويم من يناير إلى مايو دفعة واحدة، فستحتاج إلى إنشاء التقويم خمس مرات باستخدام الطريقتين السابقتين. الآن سأقدّم لك أداة مفيدة لحل هذه المهمة بسرعة وبسهولة.
إنشاء تقويم شهري أو سنوي بسهولة باستخدام تقويم دائم
التقويم الدائمهي إحدى الأدوات القوية فيKutools لـ Excel، ويمكنها مساعدتك في إنشاء تقويم شهري أو سنوي في Excel بنقرة واحدة!
1. انقر فوقKUTOOLS PLUS > Worksheet > تقويم دائم.
2. في النافذة المنبثقة، حدد عدد الأشهر التي تريد إنشاء التقويم لها، ثم انقر فوقCreate. انظر لقطة الشاشة:

ثم يتم إنشاء ورقة عمل جديدة تحتوي على خمسة أوراق عمل للتقويم. انظر لقطة الشاشة:
تلميح:
إذا كنت ترغب في إنشاء تقويم لشهر معيّن فقط، فكل ما عليك هو تحديد ذلك الشهر نفسه في حقلَي «From» و«To» في مربع النص بالنوافذ.
انقر هنا لمعرفة المزيد حول تقويم دائم
أفضل أدوات الإنتاجية لمكتبتك
عزِّز مهاراتك في Excel باستخدام Kutools لـ Excel، وعايش الكفاءة كما لم تفعل من قبل.يقدّم Kutools لـ Excel أكثر من 300 ميزة متقدمة لتعزيز الإنتاجية ووقت الحفظ.انقر هنا للحصول على الميزة التي تحتاجها أكثر من غيرها...
يجلب Office Tab واجهة ذات علامات تبويب إلى Office، ويجعل عملك أسهل بكثير
- تمكّن من التحرير والقراءة باستخدام علامات التبويب في Word وExcel وPowerPoint، وPublisher وAccess وVisio وProject.
- افتح وأنشئ مستندات متعددة في علامات تبويب جديدة داخل النافذة نفسها، بدلاً من فتح نوافذ جديدة.
- يزيد إنتاجيتك بنسبة 50% ويوفّر لك مئات نقرات الفأرة كل يوم!
جميع الإضافات من Kutools في برنامج تثبيت واحد!
Kutools for Office حزمةٌ تحتوي على إضافاتٍ مخصصة لتطبيقات Excel وWord وOutlook وPowerPoint، إلى جانب Office Tab Pro، مما يجعلها الخيار المثالي للفِرق التي تعمل عبر تطبيقات Office.
- حزمة شاملة واحدة— إضافات Excel وWord وOutlook وPowerPoint بالإضافة إلى Office Tab Pro
- برنامج تثبيت واحد، ترخيص واحد— الإعداد خلال دقائق (جاهز لـ MSI)
- يعمل بشكل أفضل معًا— إنتاجية ميسَّرة عبر تطبيقات Office
- تجربة مجانية لمدة 30 يومًا بكامل الميزات— بدون تسجيل، بدون بطاقة ائتمان
- أفضل قيمة— وفِّر مقارنةً بشراء الإضافات بشكل منفصل