Outlook: تغيير المجلد الذي يتم فيه تخزين الرسائل المرسلة
في Outlook، يتم عادةً حفظ رسائل البريد الإلكتروني المرسلة تلقائيًا في مجلد «المرسلة». لكنك قد تجد أن تخزينها في مجلد مختلف يُعد خيارًا أكثر تنظيمًا وفعالية. يقدّم لك هذا الدليل طرقًا بسيطة لتغيير مجلد الرسائل المرسلة الافتراضي، مما يمكّنك من إعادة توجيه رسائل البريد الإلكتروني المرسلة بسهولة إلى مجلدات بديلة في Microsoft Outlook.
تغيير المجلد الذي يتم فيه تخزين الرسائل المرسلة أثناء كتابتك للرسالة
تغيير المجلد الذي يتم فيه تخزين جميع الرسائل المرسلة تلقائيًا
تغيير المجلد الذي يتم فيه تخزين الرسائل المرسلة أثناء كتابتك للرسالة
عند كتابة رسالة بريد إلكتروني، يمكنك تحديد مجلد بديل لحفظ نسخة منها بعد إرسالها.
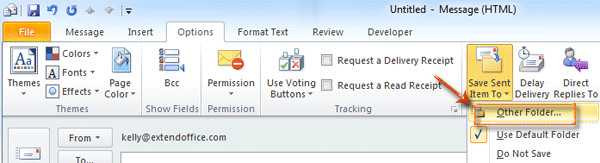
الخطوة 1: انقر علىحفظ العنصر المرسل في مجلد آخرفي مجموعةخيارات إضافيةعلى علامة التبويبخياراتفي نافذة الرسالة.
الخطوة 2: في مربع حوارتحديد مجلد، حدد وظلّل مجلدًا من مربعالمجلدات، ثم انقر على زرموافق.
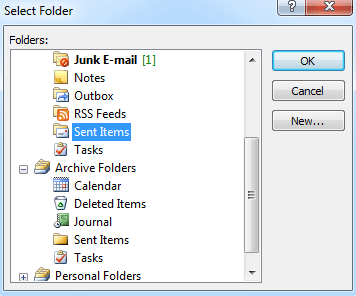
بعد إرسالك هذه الرسالة الإلكترونية، سيتم تخزين نسختها في المجلد الذي حددته في الخطوة 2 تلقائيًا.
مساعد البريد الذكي في Outlook: ردود أذكى، وتواصل أوضح (سحر بنقرة واحدة!)
بسِّط مهام Outlook اليومية مع مساعد البريد الذكي من Kutools لـ Outlook! تعلّم هذه الأداة القوية من بريدك السابق لتقدّم لك ردودًا ذكية ودقيقة، وتحسّن محتوى رسائلك، وتساعدك في صياغتها وتنقيحها بسلاسة ودون أي جهد.

يدعم هذا الميزة:
- الردود الذكية: احصل على ردود مُعدَّة مسبقًا من محادثاتك السابقة—مخصصة بدقة، وملائمة تمامًا، وجاهزة للاستخدام الفوري.
- قم بتنقية نص بريدك تلقائيًا لضمان وضوحه وتأثيره.
- الكتابة دون عناء: ما عليك سوى إدخال الكلمات المفتاحية، ودع الذكاء الاصطناعي يتولى الباقي، مع توفر عدة أساليب كتابة.
- الامتدادات الذكية: وسِّع آفاقك باقتراحات ذكية تراعي السياق!
- التلخيص: احصل فورًا على نظرة عامة موجزة للرسائل الإلكترونية الطويلة.
- الوصول العالمي: ترجم رسائلك الإلكترونية إلى أي لغة بسهولة.
يدعم هذا الميزة:
- الردود الذكية على البريد الإلكتروني
- المحتوى المُحسَّن
- مسودات مبنية على الكلمات المفتاحية
- تمديد المحتوى الذكي
- تلخيص البريد الإلكتروني
- الترجمة متعددة اللغات
تغيير المجلد الذي يتم فيه تخزين جميع الرسائل المرسلة تلقائيًا
في بعض الحالات، قد ترغب في تغيير مجلد العناصر المرسلة الافتراضي لتخزين جميع رسائل البريد الإلكتروني المرسلة تلقائيًا في مجلد معيّن. سنرشدك إلى كيفية تحقيق ذلك بإنشاء قاعدة في Outlook.
قبل إنشاء قاعدة، تحتاج إلى التبديل إلى طريقة عرض البريد بالنقر علىالبريدفي التنقل.
الخطوة 1: افتح مربع حوارالقواعد والتنبيهات:
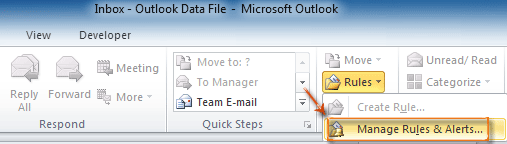
انقر علىالقواعد > إدارة القواعد والتنبيهاتفي مجموعةنقلعلى علامة التبويبالصفحة الرئيسية.
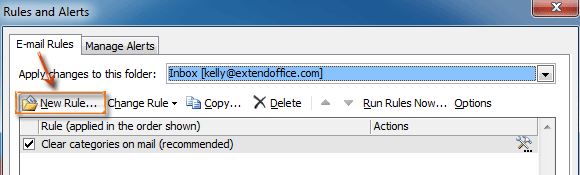
الخطوة 2: في مربع حوار «القواعد والتنبيهات»، انقر على زرقاعدة جديدةعلى علامة التبويبقواعد البريد الإلكتروني.
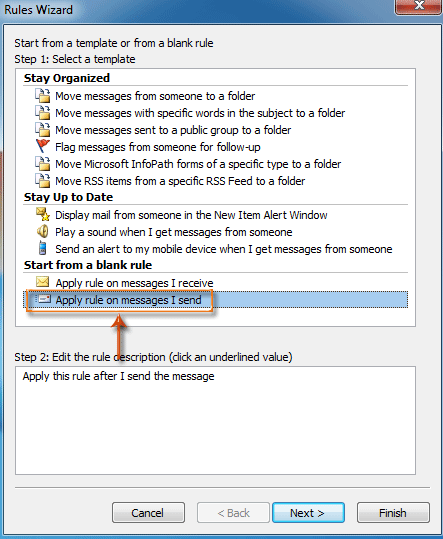
الخطوة 3: في مربع حوار معالج القواعد، حدد وظلّل الخيارتطبيق القاعدة على الرسائل التي أرسلهافي قسمابدأ بقاعدة فارغة، ثم انقر على زرالتالي.
الخطوة 4: في مربع الحوار الجديدمعالج القواعد،
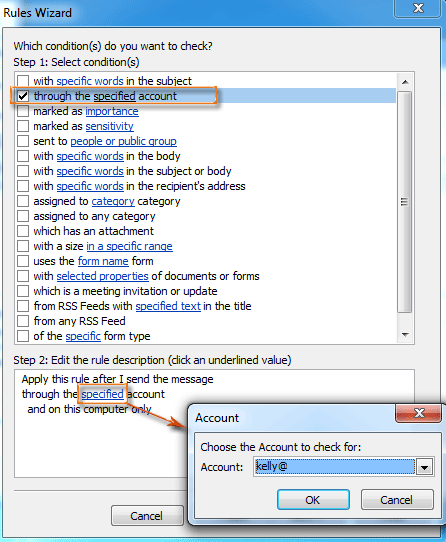
- حدد خيارمن خلال - حدد - حسابفي قسمالخطوة 1: تحديد شرط (أو شروط).
- انقر على-حدد-في قسمالخطوة 2: تحرير محتوى القاعدة.
- في مربع الحوار المنبثق «الحساب»، اختر حسابًا من مربعالحساب:، ثم انقر على زرموافق.
- انقر على زرالتالي.
الخطوة 5: في مربع الحوار الجديد معالج القواعد،
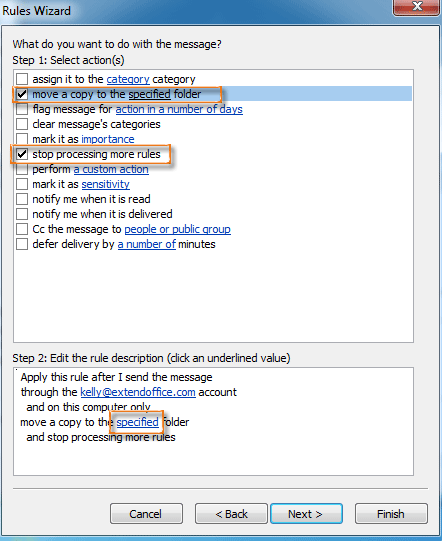
- حدد خيارنقل نسخة إلى المجلد المحدد، وحدد خيارإيقاف معالجة القواعد الإضافيةفي قسمالخطوة 1: تحديد إجراء (أو إجراءات).
- انقر على-حدد-في قسمالخطوة 2: تحرير محتوى القاعدة.
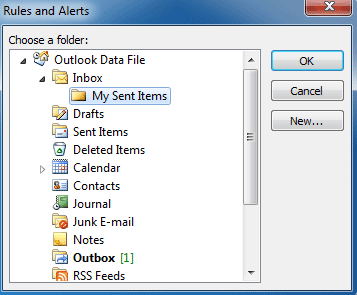
- في مربع حوار «القواعد والتنبيهات»، اختر مجلدًا، ثم انقر على زرموافق.
- انقر على زرالتالي.
الخطوة 6: استمر في النقر على زرالتالي، ثم على زرإنهاءفي مربعات الحوار التالية.
من الآن فصاعدًا، سيتم حفظ جميع رسائل البريد الإلكتروني المرسلة في المجلد الذي قمت بتحديده في الخطوة 5 تلقائيًا.
أفضل أدوات إنتاجية Office
جرِّب Kutools لـ Outlook الجديد كليًّا مع 100+ ميزة رائعة!انقر للتنزيل الآن!
📧أتمتة البريد الإلكتروني: الرد التلقائي (متوفر لبروتوكولي POP وIMAP) / جدولة إرسال رسائل البريد الإلكتروني / نسخة تلقائية/مخفية وفق القواعد عند إرسال البريد الإلكتروني / التحويل التلقائي (قاعدة متقدمة) / إضافة التحيّة تلقائيًّا / تقسيم رسائل البريد الإلكتروني ذات المستلمين المتعددين تلقائيًّا إلى رسائل فردية...
📨إدارة البريد الإلكتروني: استدعاء البريد الإلكتروني / حظر رسائل الاحتيال حسب العناوين وغيرها / حذف الرسائل المكررة / البحث المتقدم / تنظيم المجلدات...
📁المرفقات الاحترافية: حفظ دفعة واحدة / فصل دفعة واحدة / ضغط دفعة واحدة / حفظ تلقائي / تفصيل تلقائي / ضغط تلقائي...
🌟سحر الواجهة: 😊إيموجيات أكثر جمالًا وروعة / إشعارك عند وصول رسائل بريد إلكتروني مهمة / تصغير Outlook بدلًا من إغلاقه...
👍عجائب النقرة الواحدة: الرد على الجميع مع المرفقات / الحماية من رسائل التصيد الاحتيالي / 🕘عرض منطقة الوقت الحالي للمرسل...
👩🏼🤝👩🏻جهات الاتصال والتقويم: إضافة جهات اتصال دفعةً واحدة من رسائل البريد الإلكتروني المحددة / تقسيم مجموعة جهات الاتصال إلى مجموعات فردية / إزالة تذكير عيد الميلاد...
استخدم Kutools باللغة التي تفضلها – يدعم الإنجليزية، الإسبانية، الألمانية، الفرنسية، الصينية، وأكثر من 40 لغة أخرى!
افتح Kutools لـ Outlook بنقرة واحدة فورًا! لا تنتظر، نزِّله الآن وحسِّن كفاءتك!


🚀 التنزيل بنقرة واحدة — احصل على جميع إضافات Office
موصى به بشدة: Kutools for Office (5 في 1)
نقرة واحدة لتنزيلخمسة برامج تثبيتدفعة واحدة —Kutools لـ Excel وOutlook وWord وPowerPointوOffice Tab Pro.انقر للتنزيل الآن!
- ✅سهولة النقرة الواحدة: نزِّل جميع حزم الإعداد الخمس دفعة واحدة!
- 🚀جاهز لأي مهمة في Office: ثبِّت الإضافات التي تحتاجها، متى احتجتَ إليها.
- 🧰متضمَّن: Kutools لـ Excel / Kutools لـ Outlook / Kutools for Word / Office Tab Pro / Kutools for PowerPoint