كيف يمكن تغيير أو تعديل أسطر موضوعات الرسائل الواردة في Outlook؟
لأغراضٍ مثل تسهيل البحث، أو الحفاظ على اتساق محتوى الرسالة، أو لأهداف أخرى، قد تجد نفسك بحاجة إلى تعديل أو تغيير موضوعات بعض الرسائل الواردة في Outlook. وعلى الرغم من أن الأمر قد يبدو مستحيلاً للوهلة الأولى—إذ لا يوجد مكان ظاهر لإجراء هذا التعديل—فإن Microsoft Outlook يدعم هذه الميزة فعليًا. وسنرشدك هنا إلى كيفية تعديل أو تغيير موضوعات الرسائل الواردة بسهولة.
تغيير/تعديل سطر موضوع رسالة بريد إلكتروني واحدة في Outlook
تغيير/تعديل سطر موضوع عدة رسائل بريد إلكتروني في Outlook
- عزِّز إنتاجيتك في البريد الإلكترونيباستخدام تقنية الذكاء الاصطناعي، لتتمكّن من الرد بسرعة على رسائل البريد الإلكتروني، وصياغة رسائل جديدة، وترجمة الرسائل، وأكثر من ذلك بكفاءة.
- أتمتة إرسال البريد الإلكتروني باستخدامنسخة تلقائية/مخفية، والتحويل التلقائيوفق القواعد؛ وأرسلالرد التلقائي (خارج المكتب) دون الحاجة إلى خادم Exchange...
- احصل على تذكيرات مثلتنبيه عند الرد على بريد إلكتروني يحتوي على اسمي في نسخة مخفية (BCC)عندما ترد على الكل وأنت في قائمة BCC، وتذكير عند نسيان المرفقاتللمرفقات المنسيّة...
- حسّن كفاءة بريدك الإلكتروني باستخدامالرد بالمرفقات (الكل)،إضافة التحية أو التاريخ والوقت تلقائيًا إلى التوقيع أو سطر الموضوع،الرد على عدة رسائل بريد إلكتروني دفعة واحدة...
- بسِّط إرسال البريد الإلكتروني باستخداماستدعاء البريد الإلكتروني، وأدوات المرفقات (مثل ضغط الكل، والحفظ التلقائي للكل...)، وإزالة التكرارات، وتقرير سريع...
تغيير/تعديل سطر موضوع رسالة بريد إلكتروني واحدة في Outlook
سترشدك الخطوات التالية إلى تغيير أو تعديل سطر موضوع رسالة بريد إلكتروني واحدة بسرعة في Outlook. يُرجى اتباع ما يلي:
1. في طريقة عرضالبريد، انقر نقرًا مزدوجًا لفتح البريد الإلكتروني الذي تريد تغيير سطر موضوعه.
2. الآن يتم فتح البريد الإلكتروني في نافذة الرسالة. انقر على زر![]() في الزاوية السفلية اليمنى من رأس الرسالة لتوسيعه. انظر لقطة الشاشة:
في الزاوية السفلية اليمنى من رأس الرسالة لتوسيعه. انظر لقطة الشاشة:
ملاحظة: في Outlook 2010 أو الإصدارات الأقدم، يكون رأس الرسالة موسّعًا افتراضيًا، لذا يمكنك تخطي هذه الخطوة مباشرةً.
.
3. أصبح رأس الرسالة موسّعًا الآن. يُرجى تعديل سطر الموضوع مباشرةً، ثم النقر على زرحفظ. انظر لقطة الشاشة:

حتى الآن، تكون قد عدّلت سطر موضوع البريد الإلكتروني المحدد بالفعل. يُرجى إغلاق نافذة الرسالة متى شئت.
تغيير/تعديل سطر موضوع عدة رسائل بريد إلكتروني في Outlook
إذا كنت بحاجة إلى تغيير أسطر موضوعات عدة رسائل بريد إلكتروني في Outlook، فقد تبدو الطريقة السابقة مملة بعض الشيء. لحسن الحظ، تتيح لك هذه الطريقة تعديل أسطر الموضوع مباشرةً من قائمة الرسائل بعد تغيير إعدادات عرض المجلد. يُرجى اتباع الخطوات التالية:
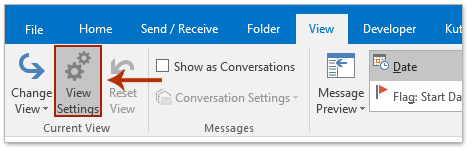
1. في طريقة عرضالبريد، افتح المجلد الذي يحتوي على الرسائل التي تريد تغيير أسطر موضوعاتها، ثم انقر علىعرض > إعدادات العرض. انظر لقطة الشاشة:
2. بعد ظهور مربع حوار «إعدادات العرض المتقدمة»، يُرجى النقر على زرإعدادات أخرى. انظر لقطة الشاشة:

3. في مربع حوار «الإعدادات الأخرى» المنبثق، يُرجى تحديد خيارالسماح بالتحرير داخل الخلية، ثم النقر على زرَيْموافقبالترتيب لإغلاق كلا مربعي الحوار.

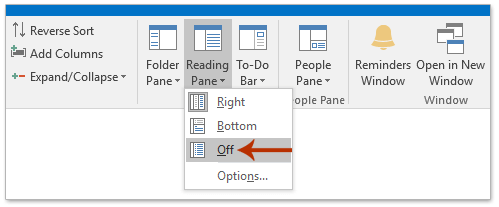
4. الآن بعد عودتك إلى المجلد، يُرجى النقر علىعرض > لوحة القراءة > إيقافلإغلاق لوحة القراءة. انظر لقطة الشاشة:
5. الآن، فيقائمة الرسائل، انقر على سطر الموضوع الذي تريد تغييره، ثم عدّله مباشرةً كما هو موضح في لقطة الشاشة أدناه.
ثم كرّر هذه الخطوة لتعديل أسطر موضوعات عدة رسائل بريد إلكتروني وفقًا لاحتياجاتك.

أفضل أدوات إنتاجية Office
جرِّب Kutools لـ Outlook الجديد كليًّا مع 100+ ميزة رائعة!انقر للتنزيل الآن!
📧أتمتة البريد الإلكتروني: الرد التلقائي (متوفر لبروتوكولي POP وIMAP) / جدولة إرسال رسائل البريد الإلكتروني / نسخة تلقائية/مخفية وفق القواعد عند إرسال البريد الإلكتروني / التحويل التلقائي (قاعدة متقدمة) / إضافة التحيّة تلقائيًّا / تقسيم رسائل البريد الإلكتروني ذات المستلمين المتعددين تلقائيًّا إلى رسائل فردية...
📨إدارة البريد الإلكتروني: استدعاء البريد الإلكتروني / حظر رسائل الاحتيال حسب العناوين وغيرها / حذف الرسائل المكررة / البحث المتقدم / تنظيم المجلدات...
📁المرفقات الاحترافية: حفظ دفعة واحدة / فصل دفعة واحدة / ضغط دفعة واحدة / حفظ تلقائي / تفصيل تلقائي / ضغط تلقائي...
🌟سحر الواجهة: 😊إيموجيات أكثر جمالًا وروعة / إشعارك عند وصول رسائل بريد إلكتروني مهمة / تصغير Outlook بدلًا من إغلاقه...
👍عجائب النقرة الواحدة: الرد على الجميع مع المرفقات / الحماية من رسائل التصيد الاحتيالي / 🕘عرض منطقة الوقت الحالي للمرسل...
👩🏼🤝👩🏻جهات الاتصال والتقويم: إضافة جهات اتصال دفعةً واحدة من رسائل البريد الإلكتروني المحددة / تقسيم مجموعة جهات الاتصال إلى مجموعات فردية / إزالة تذكير عيد الميلاد...
استخدم Kutools باللغة التي تفضلها – يدعم الإنجليزية، الإسبانية، الألمانية، الفرنسية، الصينية، وأكثر من 40 لغة أخرى!
افتح Kutools لـ Outlook بنقرة واحدة فورًا! لا تنتظر، نزِّله الآن وحسِّن كفاءتك!


🚀 التنزيل بنقرة واحدة — احصل على جميع إضافات Office
موصى به بشدة: Kutools for Office (5 في 1)
نقرة واحدة لتنزيلخمسة برامج تثبيتدفعة واحدة —Kutools لـ Excel وOutlook وWord وPowerPointوOffice Tab Pro.انقر للتنزيل الآن!
- ✅سهولة النقرة الواحدة: نزِّل جميع حزم الإعداد الخمس دفعة واحدة!
- 🚀جاهز لأي مهمة في Office: ثبِّت الإضافات التي تحتاجها، متى احتجتَ إليها.
- 🧰متضمَّن: Kutools لـ Excel / Kutools لـ Outlook / Kutools for Word / Office Tab Pro / Kutools for PowerPoint