كيف يمكن تصدير هيكل المجلدات من Outlook إلى Excel؟
في هذه المقالة، سأوضح لك كيفية تصدير هيكل مجلدات حسابك في Outlook إلى ملف Excel. يُرجى اتباع الخطوات التفصيلية الموضحة هنا لتحقيق ذلك بسلاسة.
تصدير هيكل المجلد لحسابٍ ما من Outlook إلى Excel باستخدام كود VBA
تصدير هيكل المجلد لحسابٍ ما من Outlook إلى Excel باستخدام كود VBA
قد يساعدك كود VBA التالي، يُرجى اتباع الخطوات التالية:
1. قم بتشغيل Excel، ثم اضغط مع الاستمرار على مفتاحَيALT + F11 لفتح نافذةMicrosoft Visual Basic for Applications.
2. انقر علىإدراج > وحدة نمطية (Module)، ثم الصق الكود التالي في نافذةالوحدة النمطية (Module).
كود VBA: تصدير هيكل المجلد لحسابٍ ما من Outlook إلى Excel:
Dim xExcelApp As Excel.Application
Dim xWb As Excel.Workbook
Dim xWs As Excel.Worksheet
Dim xMainFolderCount As Long
Sub OutlookExportFolderStructureToExcel()
    Dim xFolder As Folder
    Dim xExcelFile As String
    Dim xFileDialog As FileDialog
    On Error Resume Next
    Set xFolder = Outlook.Application.Session.PickFolder
    If xFolder Is Nothing Then Exit Sub
    Set xExcelApp = New Excel.Application
    Set xWb = xExcelApp.Workbooks.Add
    Set xWs = xWb.Sheets(1)
    With xWs.Range("A1", "A1")
         .Value = "Folder Structure"
         .Font.Size = 14
         .Font.Bold = True
    End With
    xMainFolderCount = Len(xFolder.FolderPath) - Len(Replace(xFolder.FolderPath, "\", "")) + 1
    Call ExportToExcel(xFolder.FolderPath, xFolder.Name)
    Call ProcessFolders(xFolder.Folders)
    xWs.Columns("A").AutoFit
    Set xFileDialog = xExcelApp.FileDialog(msoFileDialogSaveAs)
    With xFileDialog
        .AllowMultiSelect = False
        .FilterIndex = 1
        If .Show = 0 Then
            xWb.Close False
            xExcelApp.Quit
            Set xExcelApp = Nothing
            Exit Sub
        End If
        xExcelFile = .SelectedItems.Item(1)
    End With
    xWb.Close True, xExcelFile
    MsgBox "Export complete!", vbExclamation, "Kutools for Outlook"
End Sub

Sub ProcessFolders(ByVal xFlds As Folders)
    Dim xSubFolder As Folder
    For Each xSubFolder In xFlds
        If xSubFolder.Name <> "Conversation Action Settings" And xSubFolder.Name <> "Quick Step Settings" Then
           Call ExportToExcel(xSubFolder.FolderPath, xSubFolder.Name)
           Call ProcessFolders(xSubFolder.Folders)
        End If
    Next
End Sub

Sub ExportToExcel(ByRef xFolderPath As String, xFolderName As String)
    Dim i, n As Long
    Dim xPrefix As String
    Dim xLastRow As Integer
    i = Len(xFolderPath) - Len(Replace(xFolderPath, "\", "")) - xMainFolderCount
    For n = 0 To i
        xPrefix = xPrefix & "-"
    Next
    xFolderName = xPrefix & xFolderName
    xLastRow = xWs.UsedRange.Rows.Count + 1
    xWs.Range("A" & xLastRow) = xFolderName
End Sub
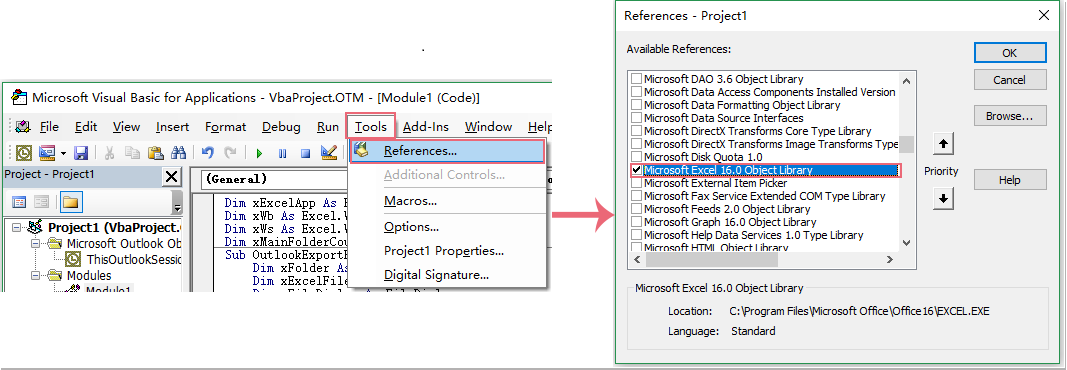
3.لا تزال في نافذةMicrosoft Visual Basic for Applications، انقر علىأدوات>المراجع (References)للانتقال إلى مربع حوارالمراجع - Project1 (References-Project1)، ثم فعّل خيارMicrosoft Excel Object Libraryمن قائمةالمراجع المتاحة (Available References)، انظر لقطة الشاشة:
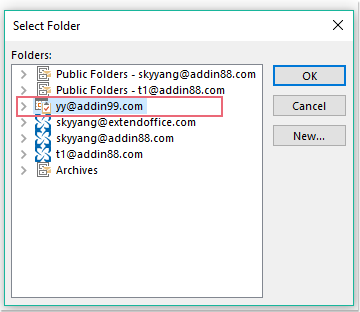
4. بعد ذلك، انقر على زرموافق (OK)، ثم اضغط على مفتاحF5 لتشغيل هذا الكود. وسيظهر مربع حوارتحديد مجلد (Select Folder)؛ يُرجى تحديد حساب البريد الإلكتروني الذي تريد تصدير هيكل مجلداته. انظر لقطة الشاشة:
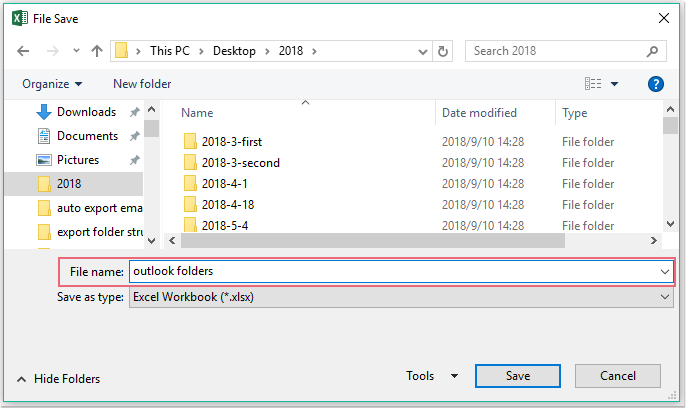
5. بعد ذلك، انقر على زرموافق (OK)، وسيظهر نافذةحفظ الملف (File Save). يُرجى تحديد موقع واسم ملف لهذا الملف المصدر. انظر لقطة الشاشة:
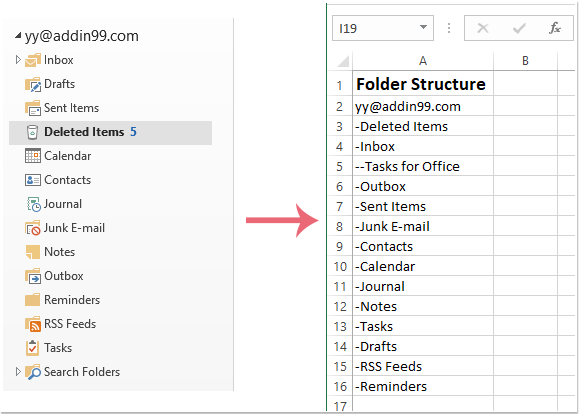
6. أخيرًا، انقر على زرحفظ (Save)، ثم اذهب إلى مصنف Excel الذي حفظته لعرض هيكل مجلد المصدر. انظر لقطة الشاشة:
أفضل أدوات إنتاجية Office
جرِّب Kutools لـ Outlook الجديد كليًّا مع 100+ ميزة رائعة!انقر للتنزيل الآن!
📧أتمتة البريد الإلكتروني: الرد التلقائي (متوفر لبروتوكولي POP وIMAP) / جدولة إرسال رسائل البريد الإلكتروني / نسخة تلقائية/مخفية وفق القواعد عند إرسال البريد الإلكتروني / التحويل التلقائي (قاعدة متقدمة) / إضافة التحيّة تلقائيًّا / تقسيم رسائل البريد الإلكتروني ذات المستلمين المتعددين تلقائيًّا إلى رسائل فردية...
📨إدارة البريد الإلكتروني: استدعاء البريد الإلكتروني / حظر رسائل الاحتيال حسب العناوين وغيرها / حذف الرسائل المكررة / البحث المتقدم / تنظيم المجلدات...
📁المرفقات الاحترافية: حفظ دفعة واحدة / فصل دفعة واحدة / ضغط دفعة واحدة / حفظ تلقائي / تفصيل تلقائي / ضغط تلقائي...
🌟سحر الواجهة: 😊إيموجيات أكثر جمالًا وروعة / إشعارك عند وصول رسائل بريد إلكتروني مهمة / تصغير Outlook بدلًا من إغلاقه...
👍عجائب النقرة الواحدة: الرد على الجميع مع المرفقات / الحماية من رسائل التصيد الاحتيالي / 🕘عرض منطقة الوقت الحالي للمرسل...
👩🏼🤝👩🏻جهات الاتصال والتقويم: إضافة جهات اتصال دفعةً واحدة من رسائل البريد الإلكتروني المحددة / تقسيم مجموعة جهات الاتصال إلى مجموعات فردية / إزالة تذكير عيد الميلاد...
استخدم Kutools باللغة التي تفضلها – يدعم الإنجليزية، الإسبانية، الألمانية، الفرنسية، الصينية، وأكثر من 40 لغة أخرى!
افتح Kutools لـ Outlook بنقرة واحدة فورًا! لا تنتظر، نزِّله الآن وحسِّن كفاءتك!


🚀 التنزيل بنقرة واحدة — احصل على جميع إضافات Office
موصى به بشدة: Kutools for Office (5 في 1)
نقرة واحدة لتنزيلخمسة برامج تثبيتدفعة واحدة —Kutools لـ Excel وOutlook وWord وPowerPointوOffice Tab Pro.انقر للتنزيل الآن!
- ✅سهولة النقرة الواحدة: نزِّل جميع حزم الإعداد الخمس دفعة واحدة!
- 🚀جاهز لأي مهمة في Office: ثبِّت الإضافات التي تحتاجها، متى احتجتَ إليها.
- 🧰متضمَّن: Kutools لـ Excel / Kutools لـ Outlook / Kutools for Word / Office Tab Pro / Kutools for PowerPoint